
Solutions
Put a Button on the Ticket Your Customer Is Already Looking At
Let customers act on their own ticket right from the Zendesk Help Center - confirm a fix, escalate, or make a choice, without emailing you or opening a new request.
install from theZendesk Marketplace
Some of your customers never touch email. They open a ticket, then check on it the same way they check anything else: they log into the portal and look at the page. If the only way to act on that ticket is to type a reply, most of them won't - not because they don't have an answer, but because typing a reply is more effort than the moment deserves.
Klick-Zen buttons can sit right on that page - the one showing the ticket's own comment thread and status - so the customer can confirm, escalate, or choose a next step without leaving it.
Where this button actually lives
This is a different placement than a trigger email or a macro. It's added to the request page - the page in your Help Center where a customer views their own ticket - and it has to be added through the Guide theme editor, by pasting HTML into the page's source. It isn't added through the Klick-Zen app or a Zendesk business rule, because there's no trigger or macro involved in someone simply loading a page.
That distinction matters for how the button gets wired up, too. The request page is rendered by your Guide theme using Zendesk's Curlybars templating (a Handlebars-based syntax), not the ticket placeholders you'd use in a trigger or macro. A standard Klick-Zen snippet won't resolve correctly if you paste it in unchanged - the placeholders need to be swapped first, which is Step 4 below.
Setup: five steps
Step 1: Copy the button snippet
- Open the Klick-Zen app from the left sidebar in Zendesk.
- From the app's main menu, click Available KlickButtons.
- Find the button you want and click the copy icon next to its HTML snippet. It's now on your clipboard.
Step 2: Open the request page template
- In Zendesk, open Guide admin.
- Click the Customize design (paintbrush) icon.
- On the theme you want to edit, click Customize, then Edit code.
- Open the
request_page.hbstemplate - this is the customer's ticket view.
Consider duplicating your live theme and editing the copy first, so you can preview the button before it's in front of customers.
Step 3: Paste the snippet
In request_page.hbs, find where you want the button to appear - near
the ticket comments or the ticket detail sidebar are common spots - and paste the
snippet in at that location. You'll convert its placeholders next.
Step 4: Convert the placeholders
The snippet Klick-Zen generates uses standard ticket placeholders. On the request page, those need to become their Curlybars equivalents:
| Standard snippet placeholder | Request page placeholder |
|---|---|
{{ticket.id}} | {{request.id}} |
{{ticket.requester.id}} | {{request.requester.id}} |
{{ticket.created_at_with_timestamp}} | {{request.created_at}} |
A standard snippet like this:
<a href='https://app.klick-zen.com/ext/href/BUTTON_ID/{{ticket.id}}/{{ticket.requester.id}}/{{ticket.created_at_with_timestamp}}'>
  <img src='https://app.klick-zen.com/ext/src/BUTTON_ID/{{ticket.id}}' />
</a>
becomes this for the request page:
<a href='https://app.klick-zen.com/ext/href/BUTTON_ID/{{request.id}}/{{request.requester.id}}/{{request.created_at}}'>
  <img src='https://app.klick-zen.com/ext/src/BUTTON_ID/{{request.id}}' />
</a>
Only the placeholders change. The button's ID and the rest of the snippet stay
exactly as Klick-Zen generated them. These placeholders only resolve inside
request_page.hbs - if the snippet ends up anywhere else, they won't
fill in and the button won't link correctly.
Step 5: Preview and publish
Preview the theme and open a ticket as a customer to confirm the button renders and links correctly. When it looks right, publish the theme. From that point on, every customer viewing their own ticket sees the button, already wired to that specific request - no per-customer setup needed.
Tips
- Swap in your own image or a text link. The wrapper HTML is yours to edit - use your own hosted image, or drop the image tag entirely and make the link plain text.
- Offer a choice. Paste two converted snippets side by side - "Resolved" and "Still need help," for example - the same way you would in an email.
- Show it conditionally. Use the template's existing Curlybars logic to only render the button for certain tickets, such as a specific status, by placing the snippet inside that block.
Troubleshooting
- The button links to a broken or empty page. The placeholders
likely weren't converted. Confirm the snippet uses
{{request.id}},{{request.requester.id}}, and{{request.created_at}}- not the{{ticket...}}versions. - The button appears, but the placeholders show as literal text.
The snippet isn't inside the request page template, or it's in a spot Curlybars
doesn't process. Confirm it's placed within
request_page.hbs. - The button image doesn't appear. Klick-Zen hosts the button images. Confirm the image URL in the snippet is intact and that your browser or theme isn't blocking the remote image.
- Changes don't show for customers. Make sure you published the theme after editing, and that you edited the theme that's actually live.
What this looks like in practice
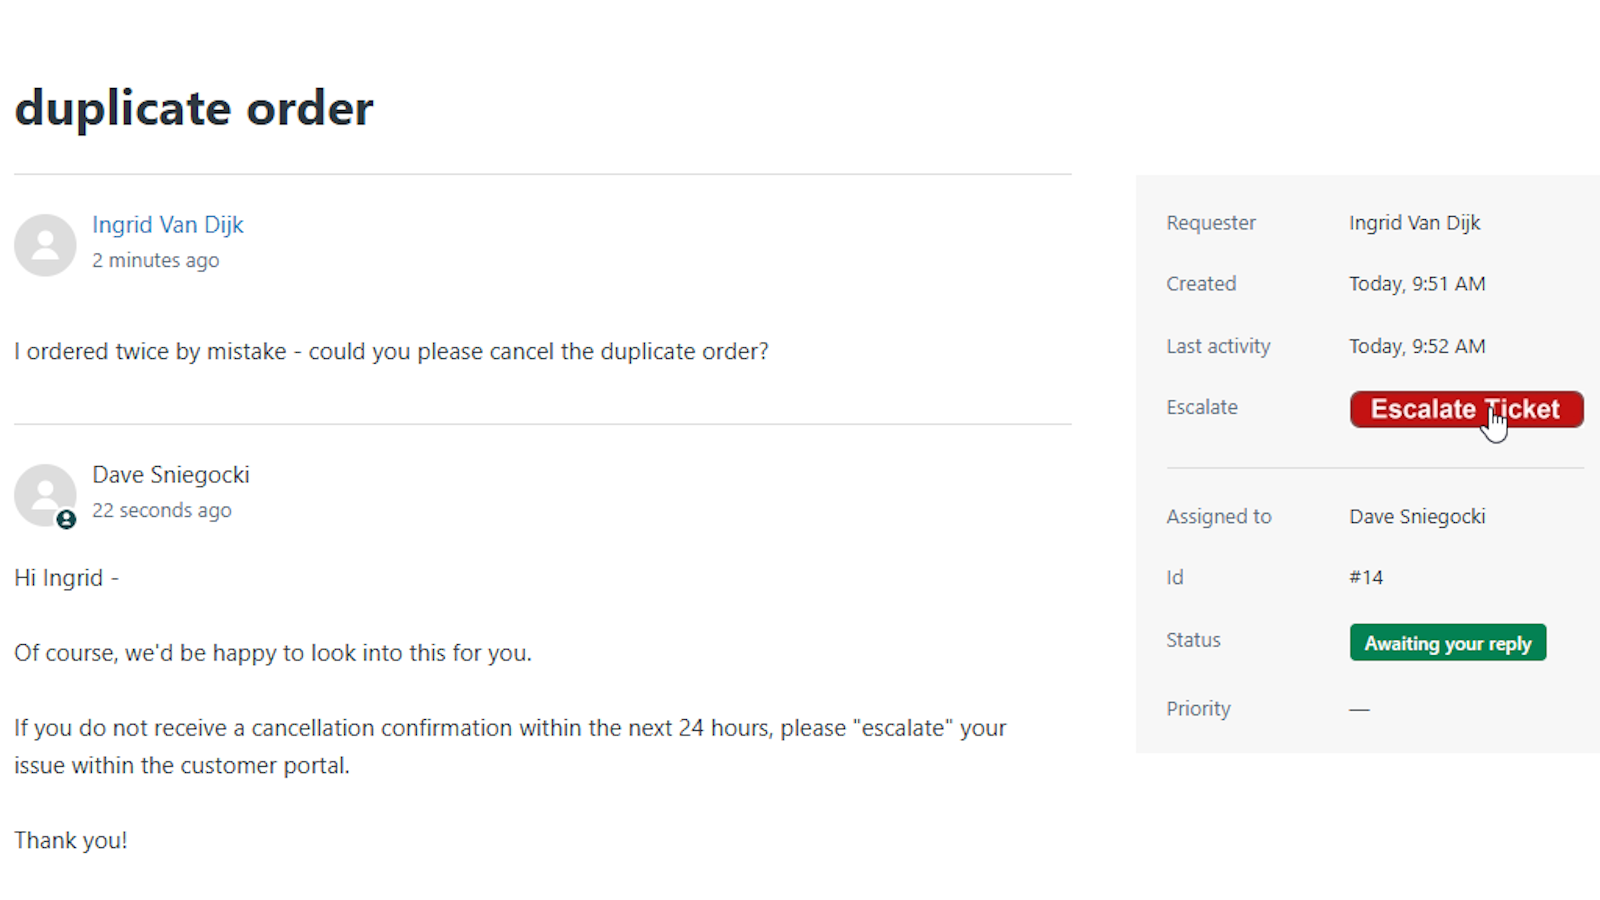
Here, an "Escalate Ticket" button sits right in the request page sidebar. The customer never leaves the ticket to use it.
Where this fits with the rest of your setup
The Help Center placement is one of three places a Klick-Zen button can live - trigger and automation emails, macros and agent replies, and now the customer's own ticket view. All three can point at the same underlying actions, so a "confirmed" click means the same thing whether it came from an email or the portal. If you're also building out no-login self-service or solve confirmation, this is the piece that covers the customers who'd rather use the portal than reply to an email.
Try it on your live theme
Duplicate your theme, paste in one converted snippet, and preview it as a customer. Once it looks right, publishing takes one click.
Talk to a real person
Got a Question? Just Email Us.
Real humans, real answers. Questions go directly to the team that builds Klick-Zen, and we respond right away.
Email us atsupport@klick-zen.com